Let’s Learn Together Sessions: Hazelcast
In this article, we will learn the basics of Hazelcast, which is popular in-memory data grid technology, and make a simple example using Java.
What is Hazelcast?
Hazelcast is an open-source technology that is designed in a distributed in-memory fashion to make scalable applications with faster data accesses and writes.
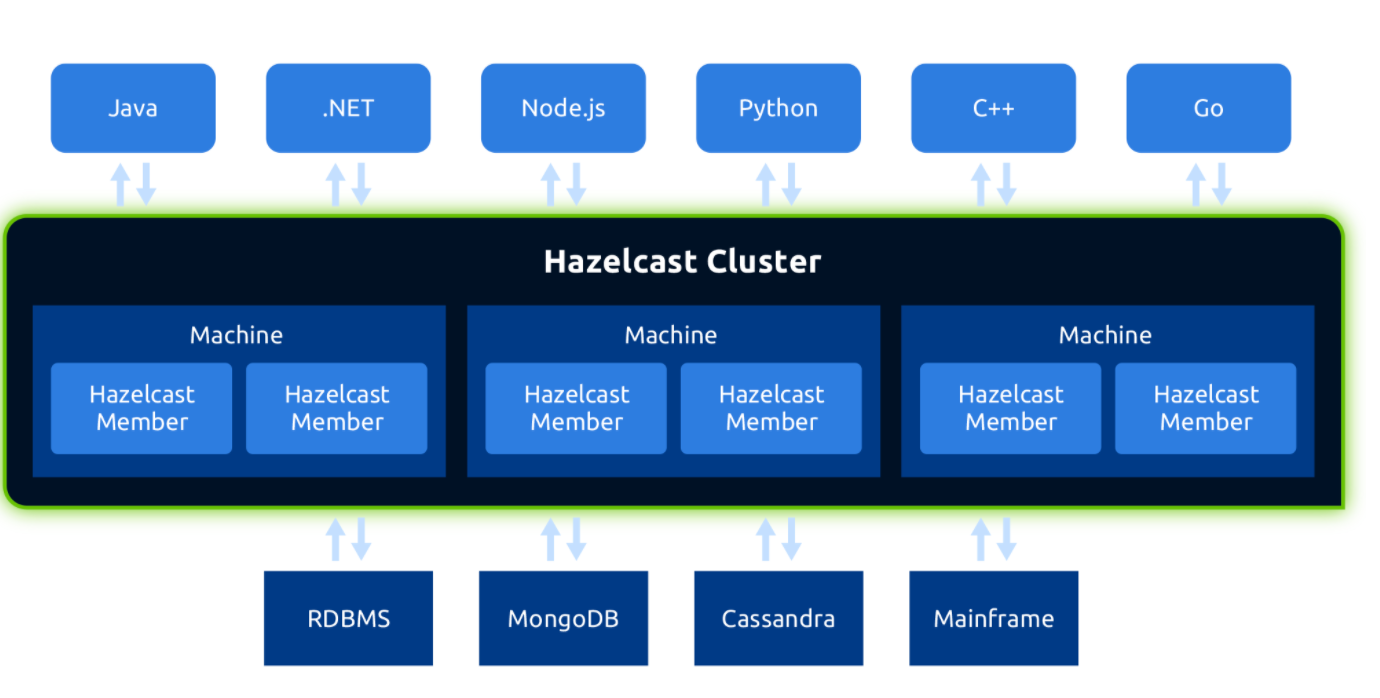
Hazelcast is implemented in Java, but provides clients for C,C++,.NET, REST, Python, Node.js, and so on… So you can easily integrate it with your backend systems by using these widely ranged clients. Another reason to choose Hazelcast is it doesn’t need external dependencies other than core Java modules.
Hazelcast provides no single point of failure for data systems. What does this mean and how does Hazelcast achieve this? Because it uses peer-to-peer communication between its members, there are no master-slave relations between cluster members. All cluster members are configured in the same way so any member can be replaced with other. (The first node created in the cluster manages cluster members, then the second oldest takes the responsibility if the first node is down.)
Hazelcast is highly scalable. If you add new members to the cluster, Hazelcast automatically discovers new members and reorganizes memory and processing capacity.
Besides all these, Hazelcast offers many distributed data structures such as standard utility collections: Map, Queue, Set, and List, Topic for pub/sub mechanisms. In addition to these, Concurrency utility data structures also are included in Hazelcast such as FencedLock, ISemaphore, and so on. If already existed distributed data structures are not enough for your need, you can create your own distributed data structure by using Service Provider Interface which Hazelcast offers for users.
Where to use Hazelcast?
Although Hazelcast is thought of as an in-memory caching solution when it comes to mind, it is more. Hazelcast is a good option for not only distributed caching needs but also can be used for synchronization, clustering, processing, and pub/sub messaging needs.
An application can use Hazelcast for faster accessing and writing to mostly used data such as session or subscriber information. In one of my old experiences, we used Hazelcast as sharing customer information and external systems session information between microservices in a microservices architecture. Thanks to Hazelcast, each microservice can reach this data fast by creating a Hazelcast client.
On the other hand, an analytic application can use Hazelcast for big data processing with partition. With the distributed processing mechanism of Hazelcast, data can be parsed and processed better and faster.
Besides, an application can place Hazelcast as the core mechanism for pub/sub communication of the application. So the application can share topics( data structure for pub/sub mechanism) with relevant users and channels to which users connected.
Many companies from different sectors use Hazelcast such as JPMorgan, Chase, Verizon, Airbus, Schneider Electric, and so on. In my country, Turkey, I know that the Hazelcast is used in telecommunication, banking, and even the insurance sector.
Hazelcast supports many operating environments such as Windows, Unix, Linux, VM solutions, and containers such as VMware, Azure, Docker, and OpenShift. Below you can reach a high-level Hazelcast infrastructure.

Hazelcast IMDG offers different editions for free and paid services for companies and individuals. Hazelcast infrastructure above shows the compatibility of Hazelcast functions or modules for different editions.
How does it work?
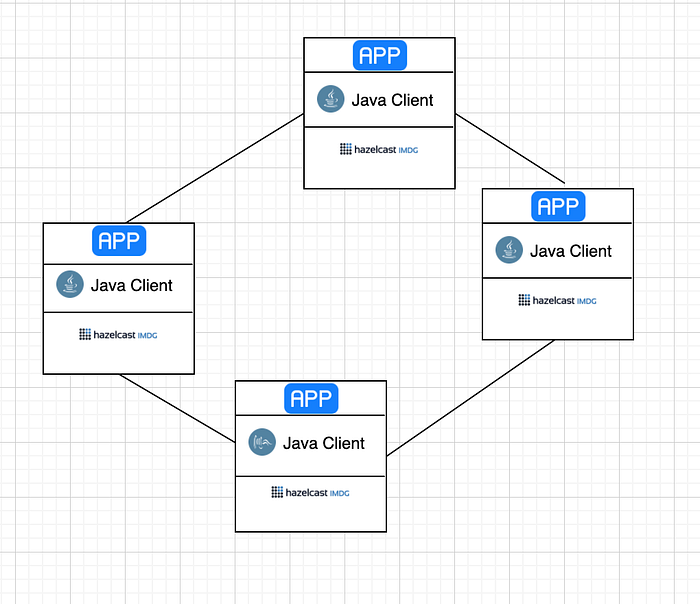
Hazelcast offers two types of deployment options for users: Embedded Deployment and Client/Server Deployment.
Embedded deployment is a must for the applications which care asynchronous and high-performance computing and low latency data accesses. But Embedded deployment only supports Java. So, if you are planning to integrate Hazelcast by using a programming language other than Java client, Embedded deployment will not be an eligible option.
In Embedded deployment, each member not only includes the application itself but also includes Hazelcast service modules.
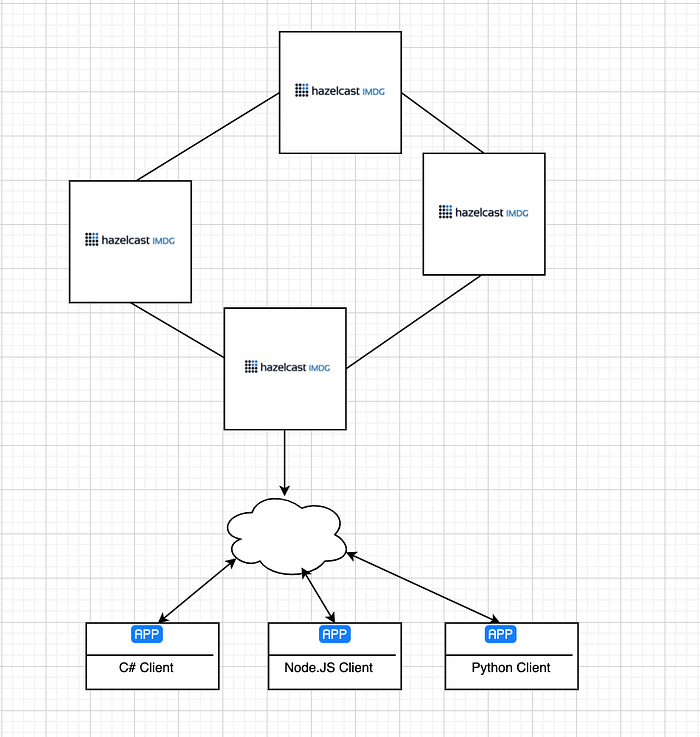
Besides Embedded deployment, you can use the Client/Server deployment option. Client/Server deployment offers isolation of Hazelcast service modules from the application. Because Hazelcast service modules are isolated from the application, you can easily diagnose problems with Hazelcast and also scale your Hazelcast service modules.
One of the strengths of Hazelcast comes from the data sharding mechanism. Each shard data block is called a partition. Partitions are memory segments that hold a bunch of data over them. Each partition includes one or more replicas over distributed cluster members. The main partition is called primary, and others are called backups.
Partition count is a dynamic attribute that you can modify declaratively over hazelcast.xml file or programmatically. For a cluster that includes a single member, the default partition count is 271. When you increase the cluster members, partitions are replicated at the rate of increasing members.
The distribution mechanism is based on a hashing algorithm. For each data in the cluster members, partition id is calculated with the below formula:

With the calculation of partition ids of each member, a partition table is created. Each cluster members know this partition table, so each member knows where the searched data is.
As I mentioned earlier, the responsibility of the partition table is at this node, since the first or oldest node in the cluster manages the cluster. It shares all the changes and up-to-date partition tables to cluster members. And also a new member comes to cluster or a member leaves cluster, repartitioning process is triggered by Hazelcast. This process is critical for partition ownership distribution.
Where to start?
I hope that I mentioned above has a place in your mind about how Hazelcast works. So we can move on to the next section of the article: How can we develop a Hazelcast cache system end to end? Where to start?
The first and most important part of developing the Hazelcast cluster is the configuration part, as in other Relational or NoSQL technologies. Hazelcast provides two ways for configuration management:
- Declarative Configuration
- Programmatic Configuration
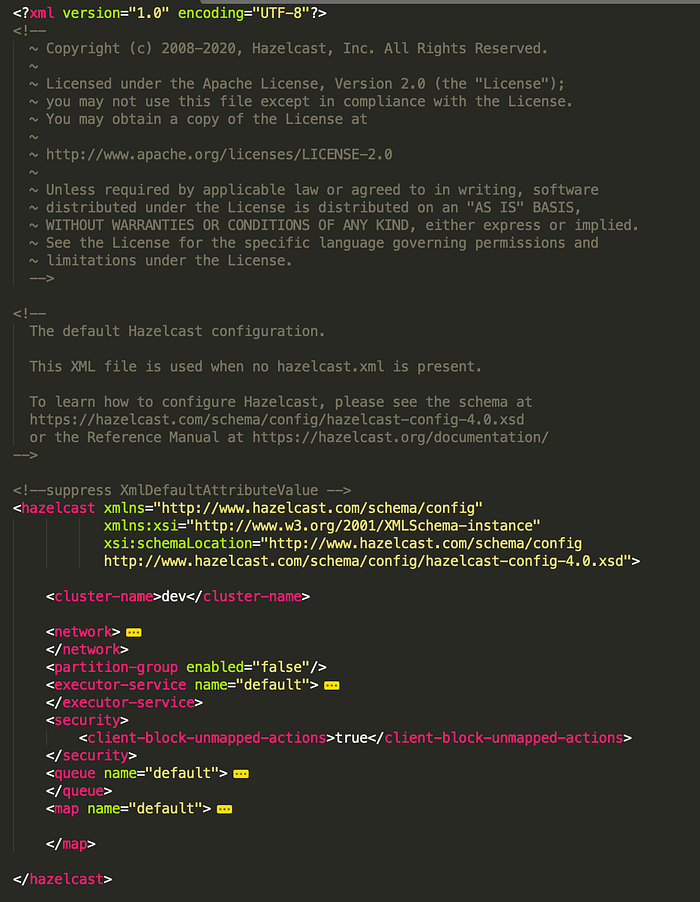
For the declarative configuration, you can use one of the hazelcast.xml or hazelcast.yaml files which are identical. (these files are located in the bin folder of downloaded hazelcast.jar) Another XML file, called hazelcast-full-example.xml or hazelcast-full-example.yaml, is a guidance document for hazelcast.xml or hazelcast.yaml files, comes in the downloaded package. You can reach many configuration elements and properties, and use them to copy needed configurations to the hazelcast.xml file. Or you can use it directly by changing its name with hazelcast.xml
You can see an example configuration below:
Another way Hazelcast configure your cluster is programmatic configuration. For this way of configuration, you can use the Config object of Hazelcast in your preferred Hazelcast client.
***Since Java is my favorite programming language, I will show examples in this article in Java language. But don’t worry, the other Hazelcast clients are quite similar.
The figure below shows an example of the Hazelcast configuration created using the programmatic configuration method:
Config config = new Config();
config.setNetworkConfig(getHazelcastNetworkConfig());
config.setClusterName("hazelcast-cluster");
config.setInstanceName("hazelcast-template");
config.setPartitionGroupConfig(getPartitionGroupConfig());
config.setProperty("hazelcast.health.monitoring.level","NOISY");
config.addMapConfig(getHazelcastMapConfig());
You can add network, partition, and distributed data structures based configurations as above. I will explain the above configurations all one by one.
With network configuration, you can set Hazelcast cluster member port numbers and enable/disable the auto-increment mechanism for new cluster members, etc. In this example configuration, we set the default port to 5900 and disable the port auto increment option. ( Hazelcast default port is 5701)
NetworkConfig networkConfig = new NetworkConfig().setPort(5900)
                          .setPortAutoIncrement(false);
The next part is about how to create a join configuration that is used to discover Hazelcast members and provides a cluster form mechanism to work. There are a bunch of different join configurations that you can use. They are ranged from TCP/IP, Multicast, AWS to Azure, and even Eureka by Netflix OSS.
In my previous experience, in the telecommunications sector, I used the TCP/IP and Multicast configurations, so I will explain the examples we will use in this article through these configurations. you can easily use other different configurations by following Hazelcast Documentation.
You can also add multiple configurations for different clusters on Hazelcast. You can enable/disable them for different cluster configurations. Below example shows both TCP/IP and Multicast configuration:
private NetworkConfig getHazelcastNetworkConfig(){

    NetworkConfig networkConfig = new NetworkConfig().setPort(5900)
                              .setPortAutoIncrement(false);

    JoinConfig joinConfig = new JoinConfig();
    TcpIpConfig tcpIpConfig = new TcpIpConfig();
    tcpIpConfig.setConnectionTimeoutSeconds(30);
    tcpIpConfig.setEnabled(true);

    List<String> memberList = new ArrayList<>();
    memberList.add("127.0.0.1:5900");
    tcpIpConfig.setMembers(memberList);

    joinConfig.setTcpIpConfig(tcpIpConfig);

    //------------------------------------------

    MulticastConfig multicastConfig = new MulticastConfig();
    multicastConfig.setMulticastTimeoutSeconds(30);
    multicastConfig.setMulticastTimeToLive(255);
    multicastConfig.setEnabled(false);

    joinConfig.setMulticastConfig(multicastConfig);

    networkConfig.setJoin(joinConfig);

    return networkConfig;
}
In the above example, we enable TCP/IP configuration by using the setEnabled method and set the connection timeout period to 30 seconds. This option means a member waits at most 30 seconds to get a response from other TCP/IP members over the network. Setting it too low a value could mean that a member is not able to connect to a cluster.
On the other hand, you shouldn’t enter a too high value for the timeout to prevent longer startup times of new cluster members. Besides, we defined the IP addresses and port numbers in which the cluster will be hosted.
On the other hand, we defined Multicast configuration but disabled it by using the setEnabled method. For this type of join configuration, we set the same time-out period as TCP / IP, that is, 30 seconds. Different from TCP/IP, we also set the multicast-time-to-live-period variable to 255. I should especially note here that you should not use the multicast configuration on production since UDP is often blocked in production environments and other discovery mechanisms are more definite.
The next configuration section is partition configuration that is critical for the mechanism of the partition process of data over a cluster. Hazelcast distributes partition replicas randomly and equally. However, this random mechanism prevents you from positioning primary data and replicas in different JVMs. For this need, Hazelcast provides group partition functionality which enables you to host primary data partitions on a partition group and replicas to another partition group. Hazelcast provides a bunch of partition group types for the distribution of partition groups. The default partition group is PER_MEMBER. In this configuration, for each member, Hazelcast defines a group partition. Like PER_MEMBER, you can use PER_ZONE for grouping Hazelcast members based on their server location. In the below configuration, we enabled group partition property and set the group partition type to PER_MEMBER as the default
private PartitionGroupConfig getPartitionGroupConfig(){

  return new PartitionGroupConfig().setEnabled(true)                                    .setGroupType(PartitionGroupConfig.MemberGroupType.PER_MEMBER);

}
You can also configure properties on Hazelcast by using key-value pairs.
You can set any configuration parameter using this key-value methodology, including the configurations I mentioned above.
Below the example, we set the Hazelcast monitoring level to NOISY. Hazelcast monitors memory and CPU usage and logs them when the usage is above the threshold. With a NOISY level, you can enable Hazelcast to print logs always, Hazelcast does not check the threshold to write logs.
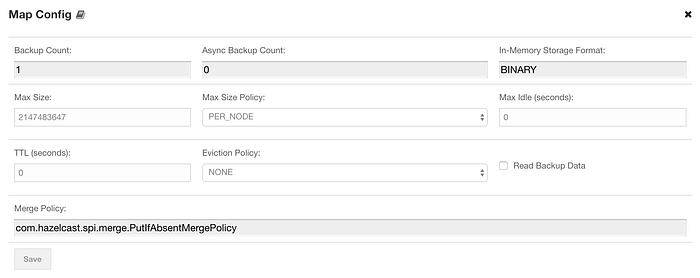
config.setProperty("hazelcast.health.monitoring.level","NOISY");The last configuration I will cover in this article is Map Configuration. As I already said that with Hazelcast you can configure even distributed data structures like Map. For my example, I used Map as a distributed data structure so, I added a map configuration as below:
private MapConfig getHazelcastMapConfig(){

    MapConfig mapConfig = new MapConfig();

    mapConfig.setName("hazelcast-map-config");
    mapConfig.setBackupCount(2);
    mapConfig.setAsyncBackupCount(1);

    mapConfig.setMaxIdleSeconds(3600);
    mapConfig.setTimeToLiveSeconds(3600);    EvictionConfig evictionConfig = new EvictionConfig();
    evictionConfig.setEvictionPolicy(EvictionPolicy.LRU);
    evictionConfig.setMaxSizePolicy(MaxSizePolicy.PER_PARTITION);
    evictionConfig.setSize(1000);

    mapConfig.setEvictionConfig(evictionConfig);

    mapConfig.setMetadataPolicy(MetadataPolicy.CREATE_ON_UPDATE);    mapConfig.setReadBackupData(false);

    mapConfig.addEntryListenerConfig(
            new EntryListenerConfig( "com.justayar.springboot.util.MapEntryListener",
                    true, false ) );

    return mapConfig;
}
First, I defined the name of my map configuration as “hazelcast-map-config”. Naming the configuration is critical to avoid confusion when using multiple map configurations in the same cluster.
Then, I set the backup count to 2. ( Default is 1). So for each data in the map, Hazelcast creates two replicas on different cluster members. And I also set the async-backup-count property for map configuration. So the question may arise here: what is the difference between synchronization and asynchronous backup? In the sync backup, Hazelcast updates backups before a put operation are completed, so it makes the cluster stable. But this causes a latency issue on each put operation, so you have to choose minimal backup count to provide high performance. (recommended maximum number of count is 6).
On the other hand, async backup operations are performed at some point in time, so the operations work faster but in this case, cluster stability can be suspicious. Default async-backup-count value is 0, but you can set it as above programmatically
Besides, keep in mind that a Hazelcast cluster can have both sync and async backup as below:
mapConfig.setBackupCount(2);
mapConfig.setAsyncBackupCount(1);
Then we defined another two properties are maxIdleSeconds and timeToLiveSeconds. These features are key determinants of the expiration of data in the Hazelcast cluster. We can define the MaxIdleSeconds value as the maximum validity time in seconds for each entry to remain on the map without calling any read or write operation. On the other hand, TimeToLiveSeconds can be considered as the value of the maximum time in seconds that each entry remains on the map without write access. Like backup counts in map configuration, you can set both MaxIdleSeconds and TimeToLiveSeconds for the same map configuration as below:
mapConfig.setMaxIdleSeconds(3600);
mapConfig.setTimeToLiveSeconds(3600);
Besides, you can set different timeToLiveSeconds for each map element.
Another important concept in Hazelcast is eviction. The eviction process is performed based on the status of partitions. If you define in your configuration that each partition node can have n elements as maximum, the partition will have to decide to which element will be evicted when the partition has n-1 elements and you would like to add a new element. The element will be added to the partition after the policy-based eviction system is done. There are three eviction policies: NONE, LRU(Least recently used), and LFU(Least Frequently Used). You can choose your policy selection using the setEvictionPolicy method and also configure the maxSizePolicy and maxSize properties as follows:
EvictionConfig evictionConfig = new EvictionConfig();
evictionConfig.setEvictionPolicy(EvictionPolicy.LRU);
evictionConfig.setMaxSizePolicy(MaxSizePolicy.PER_PARTITION);
evictionConfig.setSize(1000);mapConfig.setEvictionConfig(evictionConfig);
Metadata policy is one of the important options for preprocessing data entries on update time which makes queries return fast responses. It’s default property CREATE_ON_UPDATE, but you can disable it by passing the OFF option as below:
mapConfig.setMetadataPolicy(MetadataPolicy.OFF);On the other hand, you can add listeners to your map to track events on your map. ( operations like put, remove, evict, update, clear). You can add entry listener configuration to map by specifying listener class as below:
mapConfig.addEntryListenerConfig(
        new EntryListenerConfig( "com.justayar.springboot.util.MapEntryListener",
true, false ) );***The implementation of listener classes is in the listener section later in the article.
Like the above configurations, you can edit any configuration on Hazelcast programmatically. Now we have learned how to configure Hazelcast both declaratively and programmatically so we can move on to the next section of the article: Hazelcast Client Implementation by using Hazelcast Map.
How to implement a basic Hazelcast Map?
Hazelcast provides a bunch of distributed data structures to use in your needs such as Map, Queue, Set, List, MultiMap, Topic( Pub/Sub), and Locks. For this article, I will take Map as an example and develop a simple application by using it.
First, you need to create a hazelcast instance using the configuration earlier in the article:
HazelcastInstance hazelcastInstance = Hazelcast.newHazelcastInstance(hazelcastConfig);Then, you have to use the get method to access distributed map with a specified name. It will create a new map if it doesn't exist before. It is called in literature lazily initialization which means it creates a new Hazelcast map when it first accesses the map. We have already defined the map configuration in the configuration section of this article.
IMap<String,String> hazelcastMap = hazelcastInstance.getMap("hazelcast-map");Hazelcast Map object extends the Java ConcurrentMap interface with a distributed fashion. So you can use basic map operations are “put” for writing a new object to map(we used “set” instead here) and “get” for reading objects in the map. For this article, I defined basic CRUD operations for the Hazelcast map with the below methods:
public void putToMap(String key,String value){

    if(key == null)
        throw new NullPointerException("Key of element which is added to map cannot be null");

    if(key.isEmpty())
        throw new IllegalArgumentException("Key of element which is added to map cannot be empty");

    hazelcastMap.set(key, value);
    logger.info("New data added to hazelcast map with key: {}", key);
}public String getMapItemWithKey(String key){

    if(key == null)
        throw new NullPointerException("Key of element which is read from map cannot be null");

    if(key.isEmpty())
        throw new IllegalArgumentException("Key of element which is read from map cannot be empty");

    logger.info("Getting data item from hazelcast map with key: {}", key);
    return hazelcastMap.get(key);
}

public Map<String, String> getAllMap(){

    return hazelcastMap;
}

public void removeMapItemWithKey(String key){

    if(key == null)
        throw new NullPointerException("Key of element which is removed from map cannot be null");

    if(key.isEmpty())
        throw new IllegalArgumentException("Key of element which is removed from map cannot be empty");

    hazelcastMap.remove(key);
    logger.info("Remove item from hazelcast map succeeded with key: {}", key);
}

public void clearAllMap(){

    if(hazelcastMap.size()>0){
        hazelcastMap.clear();
        logger.info("Remove all item from hazelcast map succeeded");

    }
}
We named our first method we designed to add new members to the map as “putToMap”. Firstly, we made some null and empty checks, and then we used a “set” method instead of the “put” method in the Java Map Interface. In the distributed architecture, the put method, as described in this URL, causes overhead or performance issues because it returns the old value. If you would like to put new members to the map in which a member with the same key does not exist in the map, you can use the putIfAbsent method.
The second method is an operation that provides to access a member with a key. This is the “get” operation in the Java Map interface, so we used the same method here.
The other is removeMapItemWithKey, which is used to delete a member from the map. By using the key of the member, we removed a member with the key if it exists in the map.
The last method is designed for clearing maps by deleting all members from the map. We used the “clear” method of Java Map Interface for this functionality. You can use these four methods for your needs to add, update, elements on the map, and delete or clear members from the map. In my example design, I hold String-String pairs in my map. If your object is more complex than string, you can use simple Pojo classes for your key or values either.
For the demonstration, I created a simple controller for the CRUD endpoints which are “write”, “read”, “readAll”, “remove” and “clear” as below:
@RestController
@RequestMapping("/hazelcast")
public class HazelcastController {


    @Autowired
    private HazelcastMapManager hazelcastMapManager;

    @PostMapping("/write")
    public String writeToHazelcast(@RequestParam String key,
                                   @RequestParam String value) {

        hazelcastMapManager.putToMap(key, value);

        return "OK";
    }

    @GetMapping("/read")
    public String readFromHazelcast(@RequestParam String key) {

        return hazelcastMapManager.getMapItemWithKey(key);
    }

    @GetMapping("/readAll")
    public Map<String, String> readAllFromHazelcast() {

        return hazelcastMapManager.getAllMap();
    }

    @DeleteMapping("/remove")
    public String removeFromHazelcast(@RequestParam String key){

        hazelcastMapManager.removeMapItemWithKey(key);
        return "OK";
    }

    @DeleteMapping("/clear")
    public String clearHazelcast(){
        hazelcastMapManager.clearAllMap();
        return "OK";
    }


}
Then, we can start our Spring Boot application with the run command. When you look at the console logs, you can see the creation of the Hazelcast object. If you add new clients to the Hazelcast cluster, the members part of the log automatically updates.
2020–04–09 21:25:25.032 INFO 40330 — — [ main] c.h.internal.cluster.ClusterService : [127.0.0.1]:5900 [dev] [4.0]
Members {size:1, ver:1} [
Member [127.0.0.1]:5900 — e9b9cf09–61c2–479e-93bc-90ab6f1449a1 this]
Our demo application runs at Spring Boot port 8081. (Default Spring Boot project port is 8080). Since Hazelcast and our application running on the same machine and the Hazelcast Management Center application runs on port 8080, we changed the port of our demo application to 8081. For this change, I will add the below command to the application.properties file on Spring Boot application:
server.port=8081On the other hand, Hazelcast runs at 5900 port with a TCP/IP network. We can use the above rest endpoints to check whether our Hazelcast map implementation is working or not. Firstly you can try to write an endpoint to add a new member to the map, then use a read endpoint to access a member from the map with a key.
***The postman collections of this demo application are also available on the Github page.
As I said before, we use 8081 as our demo application port and we use the 8080 port for Hazelcast Management Center. So what is Hazelcast Management Center? Why do we use it in our application? How can we integrate it?
Hazelcast Management Center enables you to monitor and manage your cluster members running Hazelcast. In addition to monitoring the overall state of your clusters, you can also analyze and browse your data structures in detail, update map configurations and take thread dumps from members. You can run scripts (JavaScript, Groovy, etc.) and commands on your members with its scripting and console modules.
( Credit : Hazelcast Management Center Documentation)
To integrate Hazelcast Management Center, we firstly download Hazelcast IMDG from the download page(https://hazelcast.org/imdg/download/). Then, unarchive zip or tar file and go to a management-center directory inside the archived folder. You can directly start the mancenter-version.war file from the command line. After that, open your favorite web browser and go to the page: http://localhost:8080/mancenter
When you try to access this page for the first time, Hazelcast will ask you to create an admin user for security.
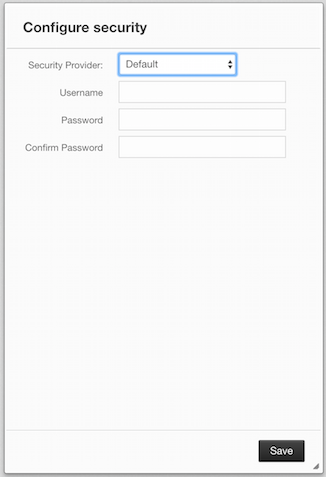
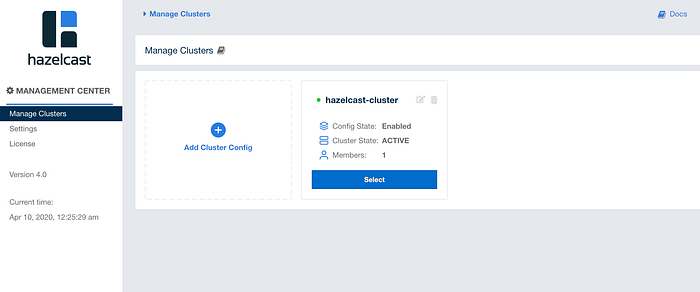
You will use this username and password for each subsequent access. After login into the system, you can reach the cluster management page. From this page, you can see your clusters or add new cluster configs. For our example, we added a new cluster config as below.

Cluster-name will be hazelcast-cluster. ( we set this in the configuration section in the article) We set the state of the cluster as enabled, and member addresses to 127.0.0.1:5900 which are defined on the join configuration part of the article.
After the cluster config is added, we can see the created cluster as below:
After selecting the created cluster, the cluster management dashboard welcomes you as below. From the cluster management dashboard, you can see cluster state, health status, heap-memory and partition distributions, memory, and CPU utilization. From the left bar, you can reach clients, members, and administration panels. On the other hand, from the storage part, you can see the used data structures with their current usage
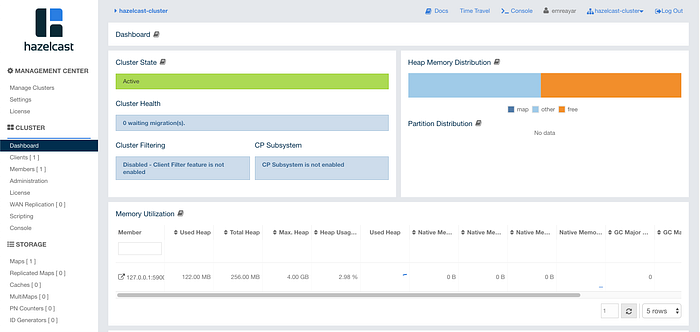
Here we can easily see the Hazelcast client that we run with our sample demo application. When you call the write command and add new members to the list and then refresh this dashboard, you can see cluster memory distributions changes and members size will be updated. In addition, you can see the map we created with the demo application in the storage section.
When you clicked the maps section from the left bar, you can see the charts about the number of entries, operations, memory, and backups over time. You can also see how many get, put, remove, and hits operations are called by clients.
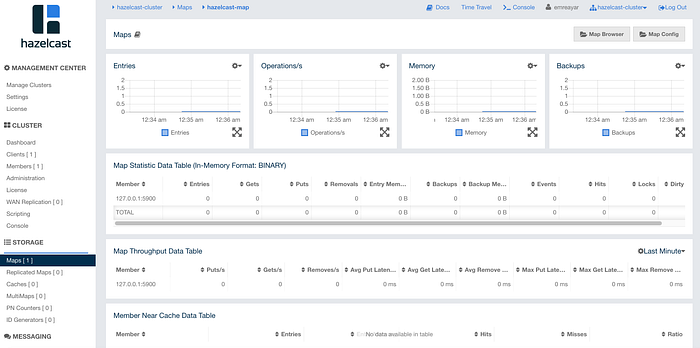
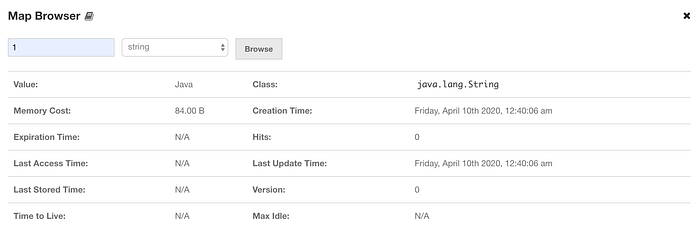
On the top of the Map Dashboard panel, there are also map browser and map config panels. Using the map browser panel and member key, you can reach objects values, timeout values, creation time, and other properties:
On the other hand, you can change map configuration with map config panel as below:
In conclusion, Hazelcast Management Center provides you a more elegant and useful dashboard with your Hazelcast clusters. You can easily monitor clusters and distributed data objects thanks to it. My personal opinion is that every application that uses Hazelcast should activate and use Hazelcast Management Center actively.
Now we turn back to our code, move on to the last part for the article: Add Listener To Map.
How to add Listener to Hazelcast Map?
With Hazelcast, you can add multiple listeners for different functionalities. You can add listeners to not only listen to clusters and also listen to distributed objects on each operation. You can use the MembershipListener interface to track new members added to the cluster and to be notified when some cluster members remove them from your cluster. In addition, you can know any attribute change on cluster members with this listener. For this functionality, we created a listener class that implements the MembershipListener interface as below:
@Component
public class ApplicationMembershipListener implements MembershipListener {


    private Logger logger = LoggerFactory.getLogger(getClass());

    @Override
    public void memberAdded(MembershipEvent membershipEvent) {
        logger.info("New member added to cluster {} ",membershipEvent);

    }

    @Override
    public void memberRemoved(MembershipEvent membershipEvent) {
        logger.info("A member removed from cluster {} ",membershipEvent);

    }
}
Then, we added this listener to the Hazelcast instance cluster with the below command:
HazelcastInstance hazelcastInstance = Hazelcast.newHazelcastInstance(hazelcastConfig);

hazelcastInstance.getCluster().addMembershipListener(applicationMembershipListener);
Besides cluster listener interfaces, Hazelcast provides distributed object listeners. Because I used map in our demo application, I added the EntryListener interface to the map. With this interface, I can follow any changes on maps such as a new element added to the map, or an element removed from the map, or a get operation event triggered on the map. You can also follow the eviction events by using this interface.
public class MapEntryListener implements EntryListener {

    private Logger logger = LoggerFactory.getLogger(getClass());


    @Override
    public void entryAdded(EntryEvent entryEvent) {

        logger.info("New object added to map with key {} and value {}",entryEvent.getKey(),entryEvent.getValue());
    }

    @Override
    public void entryEvicted(EntryEvent entryEvent) {

        logger.info("Map Entry was evicted : {}",entryEvent);

    }

    @Override
    public void entryRemoved(EntryEvent entryEvent) {

        logger.info("Object with key {} removed from map.",entryEvent.getKey());

    }

    @Override
    public void entryUpdated(EntryEvent entryEvent) {

        logger.info("Object with key {} updated from {} to {}.", entryEvent.getKey(),entryEvent.getOldValue(),entryEvent.getValue());

    }

    @Override
    public void mapCleared(MapEvent mapEvent) {

        logger.info("Map was cleared : {}",mapEvent);


    }

    @Override
    public void mapEvicted(MapEvent mapEvent) {

        logger.info("Map was evicted: {}",mapEvent);

    }

    @Override
    public void entryExpired(EntryEvent entryEvent) {

    }
}
To activate this listener on the Hazelcast instance map object, you have to add it to distributed map object as follow:
hazelcastMap = hazelcastInstance.getMap(ApplicationConstants.HAZELCAST_MAP);
hazelcastMap.addEntryListener(mapEntryListener,true);
In listener class, I added logs to track the events. So you can see an example log when you call a “putToMap” operation on the map:
2020–04–11 13:37:28.925 INFO 4587 — — [emplate.event-2] c.j.springboot.util.MapEntryListener : Object with key 1 updated from Java to Java.
Conclusion
Hazelcast provides highly scalable, distributed, and faster data accesses and writes for different needs such as caching, data analytics, data processing, or so on. It supports many operating environments and has many clients for different software languages. The big part of the Hazelcast infrastructure is open source so you can use it on your enterprises or freelance solutions.
Hazelcast provides many distributed objects, thread-safe objects, and even topic objects for pub/sub mechanisms, and also gives you a chance to implement your own distributed data objects with customized configurations thanks to SPI(Service Provider Interface).
Hazelcast partition and sharding mechanism guaranteed high available and consistent data infrastructure. In addition to, peer to peer system( all nodes configured the same way), the data loss problem is fully eliminated.
I use Hazelcast on my freelance and enterprise solutions, and highly recommend Hazelcast you to try.
The code is available on Github.
This is my first article in Medium, so feel free to give feedback :)

